
03 / New tree planting system
LevelLock
Stop trees sinking after planting.
A tree can be planted at the right level and still sink as loose soil settles. LevelLock keeps the root ball on firm, undisturbed ground, protecting the planting level and providing direct access for deep watering.
Observed in our watering trial. LevelLock prevents settlement by retaining firm support beneath the root ball.
 View full drawing ⤢
The role in the system
More watering cannot fix poor planting geometry.
When a root ball sinks, surface watering may fail to reach it effectively. Our watering trial showed that a sunken root ball could require up to ten times more water for moisture to reach it. LevelLock tackles the cause: an undisturbed soil pedestal carries the root ball, while the surrounding trench provides rooting space and a deep-watering route.
Relevant settings
- Street and avenue tree planting
- Parks and public landscapes
- Projects where planting level needs careful control
How it works
From assessment to follow-up.
- 01
Retain the central support
Prepare the planting pit around a firm pedestal. Set its level to match the root ball and the intended root-flare position.
- 02
Prepare the surrounding root zone
Position the root ball, form the annular trench and install the specified watering pipe and substrate components.
- 03
Backfill, water and check
Complete the installation and check planting level, water distribution and the tree’s support during establishment.
Method drawing
Six steps. One stable starting point.
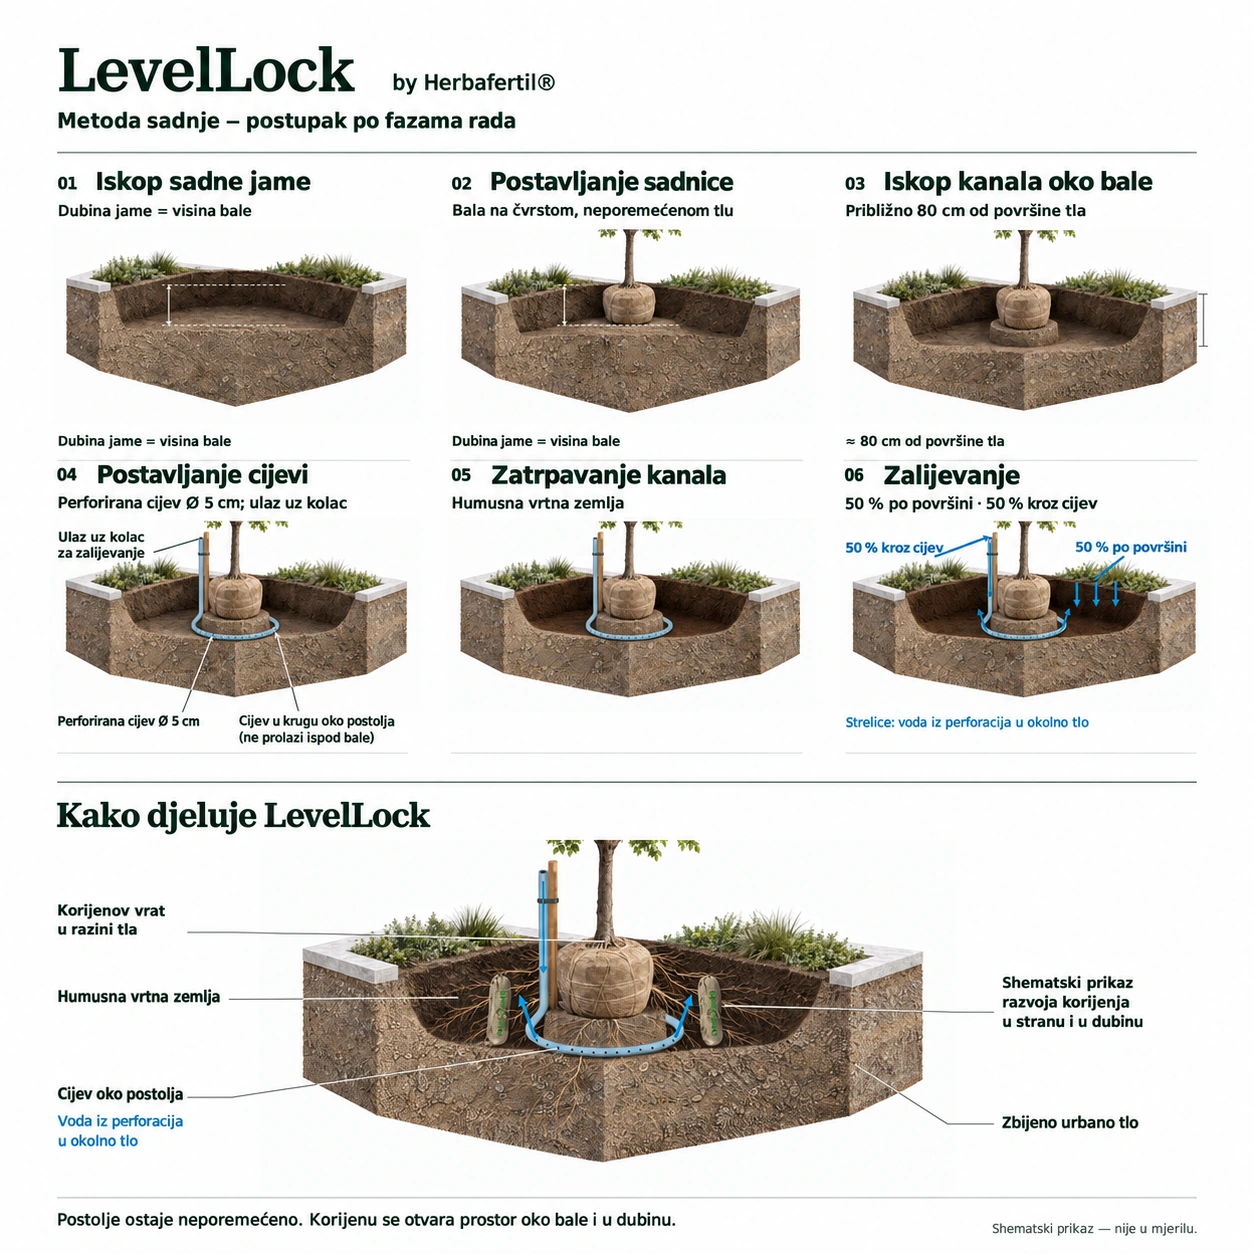
Follow the six steps: retain firm support, prepare the surrounding root zone and deliver water at depth. Enlarge the drawing for the installation details.
View full drawing ⤢Six-step installation guide
The drawing uses Croatian labels. Follow the same six numbered steps below in your selected language.
- 01
Excavate the planting pit
Match pit depth to root-ball height. Keep the supporting soil firm and undisturbed.
- 02
Position the tree
Rest the root ball on the undisturbed central support, with the root flare at ground level.
- 03
Excavate the surrounding trench
Excavate around the central support without disturbing it. The drawing shows a depth of approximately 80 cm below ground level.
- 04
Install the irrigation pipe
Run the perforated pipe around the support, not beneath the root ball. The drawing shows a 5 cm diameter pipe with its inlet beside the stake.
- 05
Backfill the trench
Backfill with humus-rich garden soil while preserving the firm central support.
- 06
Irrigate at the surface and at depth
The illustrated method distributes 50% of the water at the surface and 50% through the pipe. Perforations deliver water into the surrounding soil.
Before you specify
Start with the site information.
The six-step drawing explains the principle. Pit dimensions, pipe layout, substrate and tree support must be adapted to the root ball, ground conditions and project design.
Explore the application ↗Start with your site
Every tree starts with a place.
Tell us about the trees, the site and the challenge. We can discuss a technical approach, a field intervention or a monitored pilot.
Discuss your project